How To Create Great Looking Social Media Images Using Canva
BY laura
Updated: 11th October, 2022
Creating social media images can be a harder task than it may appear. Upon the clients requests, you load up Photoshop with the intention of creating a great image that they will love. You are then met with hundreds of different tools and settings, most of which you can't make head nor tail of. Unless you have experience using Photoshop or similar programs, then creating high-quality professional images for social media can be tricky. Paint just really isn't going to cut it.....
That is where Canva comes in. Canva is a fantastic browser-based tool for creating great images for social media with ease. It allows you to easily create your own graphics, as well as adding a range of different elements. It's simple drag and drop feature means you can start with a base image and add anything you like. From text to borders, stickers to other designs, Canva allows you to do it all.
Not only can you upload your own images, Canva also has a large stock photo inventory. Will a lot of them will cost you, there are still some great free ones available.
So if you've decided you want to use Canva to create some awesome looking social media images and wow your client, here is everything you need to know:
Benefits of Canva:
Pre-sized social media templates.
Designer type templates get your graphics started.
Lots of size and shape options.
Saves your images to be edited or downloaded later.
It’s easy to make multiple, similar graphics from a template.
Step 1: Selecting Size and Shape
Canva has a range of pre-loaded templates for the optimal images sizes for all the main social media platforms, making it very easy to get the correct size. The templates include profile and header image sizes, adverts and standard timeline images. Of course, if you are after a specific size, you use custom shapes and dimensions to create the idel image size. As soon as you select the size and shape you want, it will fill your screen as a blank area. From there, you can start creating your design.
Step 2: Set Your Background
When it comes to a background, you have plenty of options. Canva offers plenty of backgrounds for you to choose from, both free and paid (most are $1). The backgrounds they are offer range from basic designs to high-quality stock images, so there is a wide range of options to choose from. Alternatively, you can fill your canvas with a solid colour of your choice.
The third option, and one of the most popular, especially when creating social media images for clients, is uploading your own photo to use as the background. To do this, go to the Uploads tab where you can upload any photo you wish, or simply drag and drop! All your previously uploaded photos will be saved within Canva so you can use them again at a later date.
Step 3: Adding Text
Select the Text tab to add headings, paragraphs and small pieces of text. There are loads of options when it comes to adding text. You can either choose from one of the standard fonts or choose a unique font which can include borders or underlines. The usual Bold and Italic options are available, as well as the option to insert a list.
Canva also gives you the option to upload your own font, which is prefect is your client has certain requirements. Once you have added any text to your image canvas, click on the ‘font’ box in the top right that allows you to change the font. From there, at the bottom, you will find an option to click to upload your own fonts.
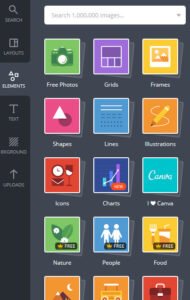
Step 4: Adding Elements
Not only does Canva allow you to add your own images and text, but, if you wish, also allows you to add different elements to your design. You can add various shapes, lines, frames and icons, not to mention a host of ot
her bits and pieces to really make your design stand out. There are a range of free and paid elements, most of which have customisable colour and transparency.
Step 5: Finish and Save
All finished? It’s time to save your design. Canva automatically saves the design in your account as you go along. But, if you want your design as a JPEG or PNG, in the top right corner you will see a Download button. Click this and either select ‘As an image’ or ‘High Quality PDF’. The design will then be saved to a location of your choice.
If saving multiple images at the same time, they will be download as a .zip file, which you can then export the images from.
Overall, Canva is a fantastic tool for creating images, whether to be used for social media or not. It's easy to use features and bountiful options provide a great alternative to Photoshop, with arguably similar results, depending on the goal.
If you wish to start using Canva, just head over to the website to start creating!
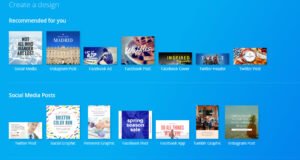 Canva has a range of pre-loaded templates for the optimal images sizes for all the main social media platforms, making it very easy to get the correct size. The templates include profile and header image sizes, adverts and standard timeline images. Of course, if you are after a specific size, you use custom shapes and dimensions to create the idel image size. As soon as you select the size and shape you want, it will fill your screen as a blank area. From there, you can start creating your design.
 Step 2: Set Your Background
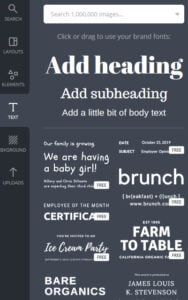 Step 3: Adding Text